
Sahale Glacier Camp: Everything to know about backpacking here
Sahale Glacier Camp is perhaps the most coveted backpacking destination in all of the North Cascades. The hike to the glacier is touted as the most spectacular trail in the region, if not the state. If you are looking for breathtaking 360-degree mountain views, incredible wild animal sightings, resplendent wildflower blooms in summer or fall colors in autumn, lake views, and the ability to touch a real-life glacier, the Sahale Arm trail is for you.

I backpacked this trail in early August. While the Sahale Glacier Camp can be reached as a day hike, what makes hiking it as an overnight special is the ability to see both sunset and sunrise from the camp. I can promise you, it will be one of the most memorable sunsets of your life.
When to hike Sahale Glacier camp
The Sahale Glacier area is best reached during the window from late July through mid-September. This is when you will have the best chance to avoid hiking through snowfields. The wildflowers are likely to be blooming in late July and early August, and in September you can enjoy an explosion of fall colors. Technically, sites can be reserved at the camp earlier in the season (starting some time in May) and also later (through early/mid-October). If you are comfortable with snowy conditions, these could be options for you as well.
How to get a permit for Sahale Glacier camp
To backpack to Sahale Glacier Camp, you will need a permit. There are two ways to get one. First, you can apply for the lottery. The lottery generally opens for about 2 weeks in early March, with winners announced mid-late March. Approximately 15-20% of applicants will win the early access lottery.
If you win, you will be assigned a date and time when you will be able to make your reservation. You will proceed to recreation.gov, select “North Cascades National Park Backcountry Permits”, select Cascade Pass Area, Sahale Glacier Camp, and the number of people in your group. Have multiple dates in mind in case your top choice is unavailable. There are only 4 reservable Sahale Glacier Camp sites, with a maximum capacity of 4 people per site.
The second way to get a permit is to get a walk up permit. The National Park Service notes that about 40% of permits are kept for walk up applicants. This involves being at the Marblemount Wilderness Information Center before it opens (7 am) to wait in line. They have a number dispenser outside, so you can grab a number as soon as you arrive. I’ve read that it usually only works if you can do one or even two nights somewhere else nearby, and get a second or third night at the Sahale Glacier Camp. This is because people who walk up are also able to reserve multiple nights, and due to the popularity of this camp, this is often what happens.

Either way, it’s tough to snag one of these permits. But with a bit of luck, you’ll have the most magical experience.
Getting to the trailhead and parking
The trailhead begins at the end of Cascade Pass Road, which generally opens late June or early July and closes in October. You can check road status here. It’s partially paved and partially gravel, but any car can make it driving carefully.
Because this trail is so popular and only accessible a short window of time, expect big crowds, especially on weekends. When we arrived on a Saturday morning at 9:30, the parking situation was out of control. People had illegally parked covering part of the road, making an already one-way road situation even worse.

We ended up having to back out, driving backwards a solid half mile, to return to an area where we could safely park on the side of the road, off the roadway. It added 1.5 miles to our hike. Please do not park on the road/blocking cars. Be sure you are parking legally and that large emergency vehicles can pass by!
I don’t know if you can even really avoid this; the best bet would be to arrive before the Wilderness Information Center opens so you’re earlier in line. We had to wait for 13 groups of people to be served when we arrived at the Center at 7:40 am, so that set our starting time back quite a bit.

The Cascade Pass and Sahale Arm trails
If you won the early access lottery, you will need to pick up your permit at the Marblemount Wilderness Information Center the day of your hike. All permits need to be secured to your backpack. Rangers will put your permit in a plastic bag and give you a twist tie which you can secure to your backpack and then your tent. Make sure you do this before beginning the trail.
The Cascade Pass parking lot has a toilet, so be sure to stop by on your way if needed. Then you can hit the trail! The first portion of the trail consists of 30+ shaded switchbacks in the forest up towards the pass. You’ll catch glimpses of the mountains on the way up, but will be mostly in the trees.

The total distance of the trail is 6 miles from the parking lot to the camp. With 30-40 pound backpacks, even going at what we felt was a decent clip, it took us about 6.5 hours. It took longer than I expected, probably due to the weight, elevation gain, and afternoon heat.
Once out of the forest, the views start and don’t ever stop! You will see the mountains, but also could see marmots and pika if you’re lucky. If you are visiting in wildflower season, you can expect to see some gorgeous blooms, too. You will also cross some rocky shale, so be mindful of your feet and ankle stability here.
By the time you reach Cascade Pass, you’ll probably be ready for a rest after gaining 1,800 feet of elevation in 3.7 miles. There are some nice bench-style rocks that are perfect for a snack and drink break while you gaze out at the lush valley below. We even saw a mama and baby bear while we rested there! You can find a toilet just up the hill, but it is just for solid waste. Make sure you pee elsewhere; liquid makes the solar composting toilets function poorly.
 Picture perfect at Cascade Pass
The climb gets steeper as you continue beyond Cascade Pass. But the views make it seem less challenging. You’ll hike through green grassy paradise (if you’re hiking in peak summer) and see even more wildflowers as you gain elevation. More mountains become visible the higher you get. The trail levels out a bit near the viewpoint for Doubtful Lake. If you’re highly energetic, you can take a detour down to the lake for a swim, but know that it will add about 900 feet of elevation loss and then gain to go there.

Once you can see Doubtful Lake, you can also see your destination. The mounds at the base of the glacier host three of the campsites. It looks like a long way away, and it can feel like it too as you hike. You get a small break between Doubtful Lake and the start of the scree that marks the final portion of the trail. Enjoy the slightly easier portion because you’ll need your energy for the last bit of trail.
Note that there is an area that will likely have water you can filter shortly before the steep final ascent. If you are out of water, it’s a good idea to filter some here, but you won’t need to carry a lot because the glacier itself is a perfect spot to filter at the top.
The final ascent was painful for us, not going to lie. It was hot, and it’s basically straight up in scree, rock, and dust for that last .5 mile. The trail isn’t totally clear. I used my AllTrails pro downloaded map to make sure we stayed on track. I also highly recommend hiking poles for this trail, it’s so steep and they are particularly helpful in this section for balance.
You’ll reach a wooden sign that indicates toilet to the left, and the camp to the right. Congrats, you did it!

The Sahale Glacier Camp itself
Each site is marked by piles of rocks in a semi circle, which offers some protection from the winds. You can claim any that is open. We snagged one right by the glacier and loved it, but honestly I don’t think there’s a bad spot in the entire camp.

Make sure you tie down your tent. I had read it was windy at the top and warned my friend who was setting up the tent about this. However, you can’t really stake down the tent given it’s pretty rocky. As we were enjoying the sunset, our tent literally FLEW AWAY like a balloon. I shouted, “RUN!” and “HELP!” as my friend and I both took off like madwomen trying to grab our tent before it flew off the mountain.
Thankfully, it came to a stop at the base of the mound where one of the campsites sits. But if it had blown a bit to the left, we would have been without a tent. We would have had to hike down in the dark when we were already exhausted. It could have been very bad, but thankfully that didn’t happen and we laughed (albeit a little hysterically) about it as we carried our banged up tent back to its spot. Then we secured it with about 10 different ties and rocks, and loaded all our gear into it so it would stay put.

The water source is pretty simple. You can filter glacier water nearby and it is so delicious and cold. Don’t worry about packing enough water for your overnight as this glacier water is something you will want to experience! There is also a bit of water shortly before reaching Cascade Pass.

The bathroom situation at Sahale Glacier Camp is a toilet is for solid waste only. While you can’t see it from the campsites, you could definitely see it from the trail below or from the glacier above. However, I’d argue that it’s preferable to poop in “public” than to have to pack out your poop in a bag. You can dispose of toilet paper in the toilet too which is nice. You’ll pee on the rocks, at a distance from your tents. The goats will probably come close to your tents regardless, but they definitely will come for your pee so be aware.

Sunset and sunrise at the camp is, to me, what makes camping at Sahale Glacier so special. It would be difficult to watch sunset here and hike down in the dark (and dare I say, too risky for me anyways). Similarly, getting to the trailhead early enough to arrive in time for dawn would be difficult. When we hiked in early August, there was already some light when I woke up at 4:55 am to my sunrise alarm.

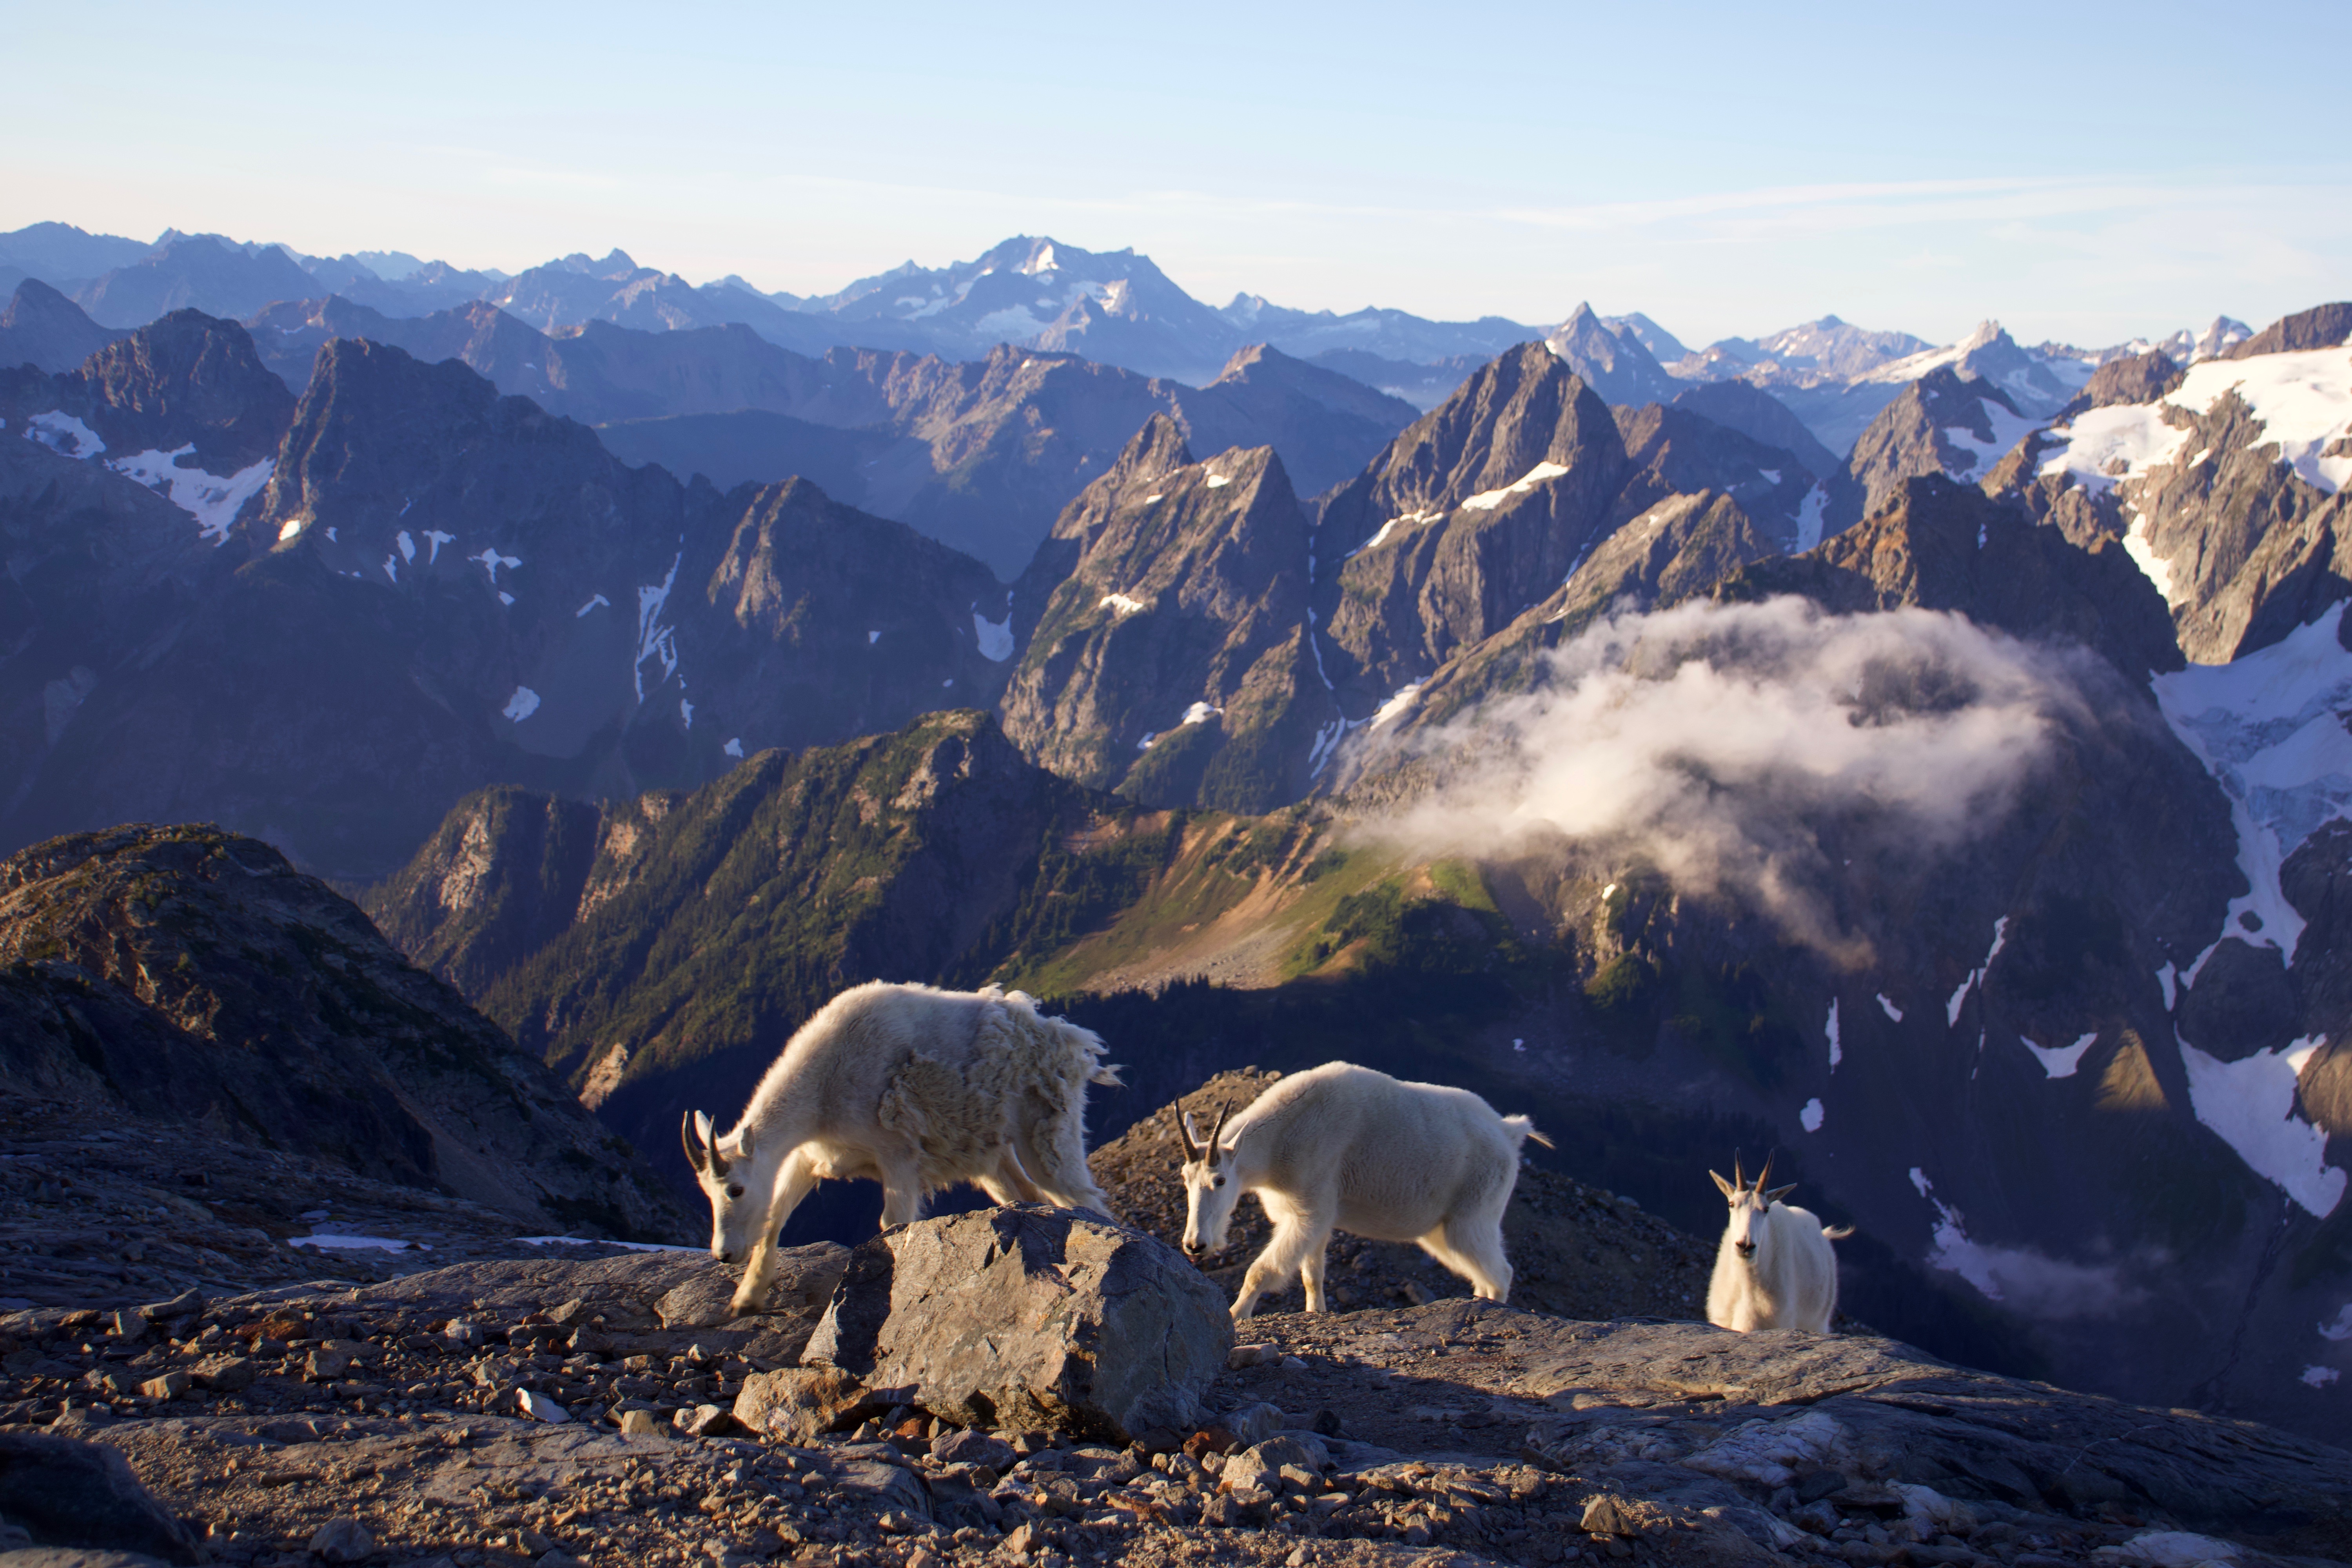
The colors are unreal. We were treated to a variety of pinks, oranges, and purples as the sun set and rose. Watching the clouds was a treat, too. In the morning, there was a total cloud inversion. This meant that it looked like we were above the clouds (and we were) as the clouds blanketed the whole area below us. We also were treated to some beautiful mountain goats wandering around in the golden morning light.
I am not exaggerating when I say that these experiences at Sahale Glacier camp were some of the most spectacular moments I’ve ever experienced in nature, and I will continue to reflect on them for the rest of my life. I’m planning to apply for the lottery again to be able to share this magical place with my husband at some point. I can’t wait to go again someday.

Other tips for visiting Sahale Glacier Camp
- Keep a respectful distance from any wild animals. The official National Park Service recommendation is 25 yards from non-predator animals and 100 yards from predators. The goats (and maybe the marmots) will probably get a lot closer to you than this, but exercise caution and definitely don’t go walking closer to them on purpose. Someone told me they were charged by a goat, and another hiker told me they were gored by a goat on another popular Washington hike.
- Pack it in, pack it out. Everything you bring in must be packed out, there is no place to discard garbage. The only exception is toilet paper, if you use the solar toilets it is allowed to dispose of your toilet paper there.
- You will enjoy the experience more if you are more fit. Try using the stair machine at your local gym, and prepare by hiking other trails with elevation gain in the weeks leading up to your trip.
- Be sure you know what time sunrise and sunset are. You’ll want to be sure you’re at the camp (and awake) for both!
What to pack for your trip to Sahale Glacier Camp
Contains affiliate links. Thanks for supporting my writing by buying gear I recommend, which will not cost you any additional money.

Here’s everything I packed for one night at the camp.
- Permit. The most essential item!
- Water filter system. My friend and I used this top-rated water filter bottle and it was awesome. 8 seconds to press 24 ounces, and an easy way to pour it into your main water reservoir or other bottles. What’s extra amazing about this filter system is that you can use this water bottle for traveling to other countries, too. My friend even used this in places like Costa Rica and India and never got sick! I’m going to buy one of these for myself.
- Water reservoir. I prefer a 2 or more liter reservoir, but 1.5-liters can also work, depending!
- Bear canister. If you don’t want to buy one, you can rent them at REI if your local store offers rentals, or also even rent one at the Marblemount Wilderness Information Center! These are required at Sahale Glacier Camp and you need to put anything with a scent in here (including food and toiletries)
- Trekking poles. This trail is so steep, I would have been suffering without them.
- Hiking boots. I’ve been loving these all summer. They even have some fun colorways if you don’t need size 12 boots like I do.
- Headlamp. An essential for safety, and super useful for moving around in the dark. I bought this one right before our trip. It’s awesome and has a bright light. Would recommend.
- Food. I brought two freeze dried backpacking meals (but only ate one), mixed nuts, fruit leather, mandarins, instant oats with raisins and brown sugar, a bar of chocolate, and corn nuts. I didn’t even eat it all. But you always want to have more food than you need! I really liked this freeze-dried coconut curry chicken, it had a lot of flavor and was really satisfying.
- Wool or synthetic layers for bed. I wore this one after we got to camp and cooled off from the ascent.
- Fleece lined leggings for bed and around camp
- Fleece jacket, essential for any mountain adventure
- Down jacket, especially for night and early morning. When it was sunny I didn’t need this, but definitely was glad to have it as sunset and at sunrise.
- Rain jacket
- Sun hoodie
- Hiking shorts or hiking pants (I wore one pair, packed another)
- Hiking shirts. I wore one and packed one. Theoretically you could just wear the exact outfit both days, but I hate being dirty and stinky and chose to carry the weight of an extra outfit.
- Sunscreen. I applied every 2 hours. My favorite spray on chemical sunscreen is by far this one (I’ve tried 6 or 7 at this point), and a good mineral option is this one
- Chapstick with SPF
- Sunglasses
- Sun hat. I bought this this summer after buying some cheap ones on Amazon where the straps kept ripping. So far, this one is holding up well and offers excellent sun protection.
- Wool socks. These are my all-time favorites.
- Down sleeping bag, I did not buy a special bag because I already had this one for camping and it worked just fine.
- Sleeping pad (prefer the air ones – loved using this one, which was way more comfortable than I expected for a backpacking mat!)
- Backpacking tent with rain fly. We used this one, it worked great.
- Wool beanie and gloves if you run cold
- Phone charger and cord
- First aid kit. I just brought some bandaids, alcohol wipes, allergy medication, and pain medication. But you can buy something like this too.
- Toothbrush, toothpaste, deodorant
- Trash bag/receptacle
- Poop bag. Thankfully I did not need this, but I had it packed. I used the solar toilets at Cascade Pass and at Sahale Glacier camp. Also, don’t forget toilet paper.
- Eye mask and ear plugs if you’re sensitive to light and noise as I am
- Camera to capture the memories
And there you have it! Everything you need to know for backpacking to Sahale Glacier Camp. I hope you have the absolute best time.


